



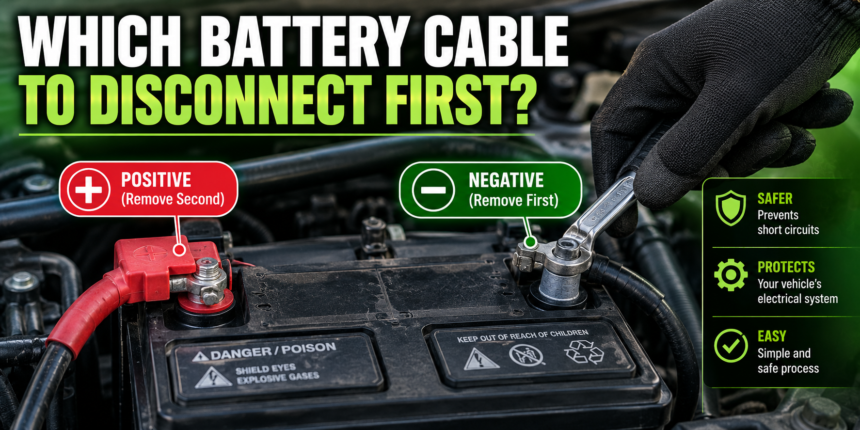
Always disconnect the negative cable first. On a car battery, that is the black cable marked with a minus (-) sign, and it should come off before the red positive (+) cable every time. When you put the battery back or reconnect it, you do the opposite: positive first, negative last.
- Do you disconnect the positive or negative terminal first?
- Why do you remove the negative battery cable first?
- Which cable do you connect first when reinstalling a battery?
- Is disconnecting a battery the same order as jumper cables?
- What happens if I disconnect the positive terminal first?
- Related Articles
This order is not arbitrary; it is a genuine safety measure that prevents a dangerous short circuit while you work. An easy way to remember it: negative comes off first and goes back on last. Get that one rule right and the rest of the job is simple. Here is why the order matters, how to tell the cables apart, and how to do it safely.
It is worth understanding the reason rather than just memorizing the order, because the reason makes it stick and helps you stay safe. The short version is that the negative cable is connected to the car’s metal body, so taking it off first cuts the circuit and makes the positive terminal safe to work on. The sections below explain that in plain terms, walk through the steps, and clear up the common mix-up with jumper cables, which follow the opposite order.
Why the negative cable comes off first
The key is understanding what the negative terminal is connected to. In almost every car, the negative battery terminal is joined by a thick cable to the vehicle’s metal body and engine, a setup called the ground. This means the entire metal frame of the car is electrically the same as the negative side of the battery.
The positive terminal, by contrast, is the ‘live’ side that carries power out to the starter and everything else. Major parts retailers agree on the negative-first rule for exactly this reason, as AutoZone’s guide to disconnecting a battery explains.
Now picture what happens when you loosen a terminal with a metal wrench. If you remove the negative cable first, you break the connection between the battery and the car’s body. After that, even if your wrench slips while you work on the positive terminal and touches the frame or engine, nothing happens, because the circuit is already broken. There is no path for current to flow.
But if you leave the negative connected and start on the positive terminal first, you are working on the live side while the whole car body is still grounded to the battery. If your wrench touches the positive post and brushes any metal part of the car at the same time, you complete a dead short across the battery.

Hundreds of amps surge through the wrench in an instant. The wrench can heat up red-hot and burn you, throw sparks, and even ignite the small amount of hydrogen gas that batteries give off, and it can damage the battery too. Removing the negative first removes that danger entirely, which is the whole point of the order.
It helps to picture just how much energy is involved. A car battery is built to crank a starter motor, which can draw hundreds of amps, and it will happily deliver that current through anything that bridges its terminals, including a steel wrench or a metal ring on your finger. There is no fuse or switch in the way. That is very different from a household outlet, which has breakers to cut the power.
With a car battery, the short happens the instant metal completes the path, faster than you can react. This is why the order is treated as a firm rule by mechanics and battery makers rather than a casual suggestion: getting it wrong turns an ordinary tool into a hazard in a fraction of a second, while getting it right makes the whole job uneventful.
The reason in one line: the negative terminal is grounded to the car’s body, so taking it off first breaks the circuit. Then a slipped wrench on the positive side has no path to short through. That is why negative always comes off first.
How to tell the negative terminal from the positive
Before you touch anything, make sure you can tell the two terminals apart, since the whole method depends on starting with the right one. A few reliable clues:
- Look for the symbols. The terminals or clamps are usually marked with a minus (-) for negative and a plus (+) for positive, often molded into the plastic. Wipe away grime if you cannot see them.
- Check the colors. By convention the negative cable is black and the positive cable is red, though color alone should be confirmed against the symbols.
- Notice the cover. The positive terminal usually has a plastic or rubber cover or cap over it, since it is the live side; the negative typically does not.
- Compare the cables. The positive cable and clamp are often slightly thicker, because they carry the high current to the starter.
If you are ever unsure, stop and confirm before proceeding. Starting on the wrong terminal is exactly what the correct order is designed to avoid.
Step by step: disconnecting safely
With the terminals identified, the process is quick. You will typically need a wrench or socket (10mm is common, but sizes vary), and ideally gloves and eye protection. If you want to keep your car’s radio presets and computer settings, plug a memory saver into the OBD-II port or a 12-volt outlet first. Then:
- Turn the engine off and remove the key. Make sure everything electrical is switched off before you start.
- Loosen the nut on the negative (-) terminal with your wrench, turning counter-clockwise, until the clamp is loose. Take care that the wrench does not touch any other metal.
- Lift the negative cable off the post, then tuck it well out of the way so it cannot spring back and touch the terminal. This is important; a cable that flops back onto the post reconnects the ground.
- Now loosen and remove the positive (+) cable the same way, and move it aside too. With the negative already off, this step is safe.
- If you are removing the battery, undo the hold-down bracket and lift it out, keeping it upright.
That is the whole disconnection. Notice that once the negative is off and moved clear, the risky part is over, which is exactly why it goes first.
One thing worth knowing before you start is what disconnecting the battery does to your car’s memory. Cutting the power can erase saved settings, radio presets, seat positions, and sometimes stored data in the engine computer, and a few vehicles will need a relearn procedure or a radio security code afterward.
That is what a memory saver prevents: it feeds a small amount of backup power to the car through the OBD-II port or a 12-volt socket while the battery is out, so nothing is lost. It is optional and not a safety item, but on a modern car with a lot of electronics it can save you a frustrating half hour of resetting things, so it is worth considering before you pull the cables.
Reconnecting is the reverse (and jumper cables differ)
When you reconnect the battery, you simply reverse the order: attach the positive (red, +) cable first, then the negative (black, -) cable last, and tighten each clamp. The logic is the mirror image, you want the grounded negative connection to be the very last thing you make, so that while you are tightening the positive terminal the circuit is not yet completed through the body.
Here is where many people get tripped up, so it is worth stating clearly: jumper cables follow the opposite order from disconnecting a battery. When jump-starting, you connect positive first, and you attach the final negative clamp to a bare metal ground on the dead car’s engine rather than to the battery’s negative post. So do not confuse the two jobs. Disconnecting a battery starts with the negative; jump-starting starts with the positive. The table below lays out all three orders side by side to keep them straight.
Order at a glance
Here is every case in one place, so you never have to guess which terminal comes first:
| Task | First | Second |
| Disconnecting the battery | Negative (-), black | Positive (+), red |
| Reconnecting the battery | Positive (+), red | Negative (-), black |
| Attaching jumper cables | Positive (+) on both | Negative last (to a ground) |
The pattern to remember for your own battery is the simple one: negative off first, negative on last. The jumper-cable row is the exception that catches people out, so keep it separate in your mind.
Safety do’s and don’ts
A few extra habits make the job safe and smooth, and most follow directly from the reason for the order:
- Do wear eye protection and gloves. Batteries contain acid and give off gas, and a slip can cause sparks.
- Do remove rings, watches, and metal bracelets. Jewelry can bridge a terminal to metal and heat up dangerously, just like a wrench.
- Do keep the removed cables clear of the posts. Bend them back or secure them so they cannot fall onto the terminals while you work.
- Don’t let any tool touch both terminals at once. A wrench across the positive and negative posts creates an instant short. Work on one terminal at a time.
- Don’t work with the engine running or the ignition on. Everything should be off before you begin.
- Do check the manual for unusual systems. Standard cars are always negative-first, but a few specialized setups, like certain RV inverters, have their own instructions, so defer to the manufacturer if your system is not a normal car.
None of this is complicated, and together with the correct order it turns a job that can spark and burn into a routine, safe task.
Conclusion
So, which battery cable do you disconnect first? The negative one, every time, the black cable with the minus sign, and you reconnect it last. The reason is simple once you know it: the negative terminal is grounded to the car’s body, so removing it first breaks the circuit and makes the positive side safe to work on, preventing a slipped wrench from causing a violent short.
Remember the mnemonic, negative off first, negative on last, keep the removed cables clear, never bridge both terminals, and reverse the order to reconnect. Just do not confuse it with jumper cables, which start on the positive. A good result is a battery disconnected and reconnected safely, with no sparks and no guesswork.
Frequently asked questions
Do you disconnect the positive or negative terminal first?
The negative terminal first, always. It is the black cable marked with a minus (-) sign. Removing it first breaks the connection to the car’s body, so working on the positive terminal afterward cannot cause a short circuit.
Why do you remove the negative battery cable first?
Because the negative terminal is grounded to the car’s metal frame. Taking it off first breaks the circuit, so if your wrench slips and touches the body while you work on the positive side, no current can flow and no dangerous short occurs.
Which cable do you connect first when reinstalling a battery?
The positive (red, +) cable first, then the negative (black, -) cable last. This is the reverse of disconnecting. Making the grounded negative connection last keeps the circuit open while you tighten the positive terminal.
Is disconnecting a battery the same order as jumper cables?
No, they are opposite. Disconnecting a battery starts with the negative cable. Jump-starting starts with the positive, and the final negative clamp goes to a metal ground on the engine, not the battery post. Don’t confuse the two.
What happens if I disconnect the positive terminal first?
You risk a short circuit. With the negative still grounded to the body, a wrench touching the positive post and any metal part completes a dead short, which can spark, heat the tool red-hot, burn you, and damage the battery. Remove negative first to avoid this.
Related Articles
Which Battery Has the Most Voltage?
How Long Do Trolling Motor Batteries Last?
How Long Does It Take to Charge a Motorcycle Battery?
How Do You Change Battery in VW Key Fob? A Complete Step-by-Step Guide