


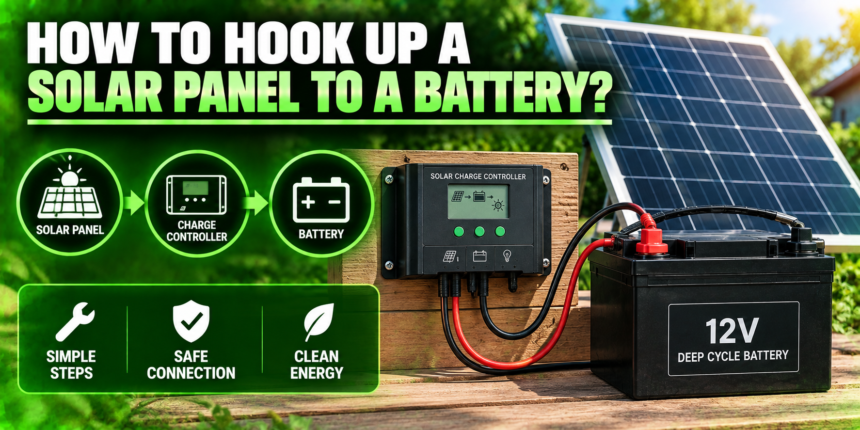
To hook up a solar panel to a battery, you wire them together through a solar charge controller, never panel straight to battery. Connect the battery to the controller first, then connect the panel to the controller, always matching positive to positive and negative to negative, with a fuse in the battery line. That order and that controller are what keep your gear safe. Here is the full walk-through for a basic 12V setup.
- Why you can’t connect a panel straight to a battery?
- What you need?
- Step-by-step: wire it in the right order
- PWM vs MPPT charge controllers
- Wire size and fuses
- Adding an inverter for AC power
- Common mistakes to avoid
- Conclusion
- Frequently asked questions
- Can I connect a solar panel directly to a battery?
- Do I connect the battery or the solar panel to the controller first?
- What size charge controller do I need?
- Do I need a fuse between the solar panel and battery?
- What battery is best for a solar setup?
- Related Articles
Why you can’t connect a panel straight to a battery?
It is tempting to just clip the panel wires onto the battery, but that is the fastest way to ruin the battery. A typical 12V solar panel actually puts out around 18 to 20 volts in full sun, well above what a 12V battery is built to take. Fed that unregulated voltage, the battery overcharges, heats up, and can boil, swell, or fail. The panel’s output also swings with the sun, surging at midday and fading in cloud, so a battery wired straight to it never sees a steady, safe charge.
The fix is a solar charge controller, sometimes called a solar regulator. It sits between the panel and the battery and does two jobs: it steps the panel’s output down to the right charging voltage, and it stops charging once the battery is full. This one part is what makes the whole system safe.
It also protects the other direction: at night, when the panel produces nothing, a good controller stops the battery from quietly draining back through the panel. So the controller is not just a safety device, it is the piece that lets the battery actually hold the charge you collect during the day.
The one exception: Tiny trickle chargers and dashboard maintainer panels, usually a few watts, have protection built in and can connect directly. Anything bigger needs a charge controller.
What you need?
A basic solar-to-battery setup uses a short chain of parts. Gather these first:
- A solar panel. Sized for how much power you need. For a small system, one 100W panel is a common starting point.
- A deep-cycle battery. A deep-cycle lead-acid or LiFePO4 (lithium) battery is built for repeated charging and draining, unlike a car starter battery.
- A solar charge controller. PWM or MPPT, sized to your panel and battery voltage. More on choosing below.
- Correctly sized wire and connectors. Stranded copper wire heavy enough for the current, plus MC4 connectors that fit most panels.
- An inline fuse or breaker. One between the battery and the controller protects the wiring if something shorts.
- Basic tools. A wrench, wire stripper, crimper, and a multimeter to check voltage and polarity.
Step-by-step: wire it in the right order
The order of connection matters more than anything else here. Do it in this sequence.
- Mount the panel first, but leave it covered. Fix the panel where it gets good sun, angled toward the sky. Keep it covered with a cloth or face-down until the wiring is done, so it is not producing power while you work.
- Connect the battery to the charge controller first. Wire the battery’s positive and negative to the controller’s battery terminals, positive to positive, with your inline fuse close to the battery. This lets the controller sense the system voltage (12V or 24V) and wake up correctly.
- Confirm the controller powers on. Most controllers light up or show a display once they see the battery. This confirms it has locked onto the right voltage before any panel power arrives.
- Now connect the panel to the controller. Wire the panel’s positive and negative into the controller’s solar terminals, matching polarity. Use a multimeter first if you are unsure which lead is which.
- Uncover the panel. Remove the cloth so the panel starts producing. The controller should now show that it is charging the battery.
- Check that it is charging. Watch the controller’s display or read the battery voltage with your multimeter. A rising voltage means power is flowing in correctly.
Why battery first: A charge controller needs the battery as a reference to figure out the system voltage. Connect the panel first and the high panel voltage can permanently fry the controller’s circuits.
PWM vs MPPT charge controllers
There are two kinds of solar charge controller, and picking the right one affects how much power you actually capture. This table lays out the difference.
| Feature | PWM | MPPT |
| Efficiency | Good for small setups | 20 to 30 percent more energy |
| Cost | Cheaper | More expensive |
| Best for | Small 12V systems, panel voltage close to battery | Systems over ~200W, higher panel voltage |
| Handles mismatched voltage | No | Yes (steps voltage down) |
The short version: PWM is cheaper and fine for a small 12V panel whose voltage is close to the battery’s. MPPT costs more but pulls noticeably more energy out of the same panel, roughly 20 to 30 percent more, and handles higher panel voltages, so it is the better pick for systems over about 200 watts.
The gain matters most in cold, bright conditions and when your panel voltage sits well above the battery, which is exactly when a PWM controller throws away the extra. For a single small panel keeping a battery topped up, the cheaper PWM is often the sensible choice; for a roof full of panels running real loads, MPPT usually pays for itself in captured power.
Wire size and fuses
Skimping on wire is a common and risky shortcut. Wire that is too thin for the current heats up and wastes power as voltage drop. As a rough guide, 10 AWG handles up to about 30 amps over short runs, 8 AWG suits 30 to 50 amps, and 6 AWG covers 50 to 75 amps.
Longer runs need thicker wire to keep voltage drop low, ideally under 2 percent on battery connections. When in doubt, size up, since thicker wire only costs a little more but runs cooler and delivers more of your hard-won solar power to the battery. A good habit is to size the wire for about 125 percent of the maximum current you expect, which leaves a safety margin for hot days and bright peaks.
A fuse or breaker is not optional. Put one in the line between the battery and the charge controller, sized to match the controller’s rating, so that if a wire chafes or a connection shorts, the fuse blows instead of the wire catching fire. For a deeper reference on wiring order and voltage drop, SolarTech’s connection guide walks through the numbers in detail.
Adding an inverter for AC power
The battery stores DC power, which runs 12V gear like lights, fans, and USB chargers directly. To run normal household AC appliances, you add an inverter, which converts the battery’s DC into 120V or 230V AC.
An inverter connects to the battery, not to the panels or the controller. Use thick, short cables between the battery and the inverter, because the current here can be large, and keep the run as short as practical to avoid voltage drop and heat.
Size the inverter to your loads, and remember that motors in things like fridges and pumps draw several times their rated power for a moment when they start, so leave headroom.
It is also worth deciding between a pure sine wave and a modified sine wave inverter: sensitive electronics, medical devices, and some motors want pure sine wave, while simple resistive loads like a basic lamp or kettle will run on either. If you only ever charge phones and run LED lights, you may not need an inverter at all, since plenty of gear runs straight off 12V DC.
Common mistakes to avoid
Most solar wiring problems come down to a handful of repeat offenders. Steer clear of these:
- Connecting the panel directly to the battery. Without a controller, the battery overcharges and fails. Always route through the controller.
- Wiring the panel to the controller before the battery. This can destroy the controller, which needs the battery voltage as its reference first.
- Reversing polarity. Crossing positive and negative can damage the battery or the controller. Check with a multimeter before you connect.
- Skipping the fuse. A short with no fuse can melt wiring or start a fire. The fuse is cheap insurance.
- Undersized wire. Thin wire runs hot and loses power. Match the gauge to the current and the run length.
- Mismatched components. A 24V panel array on a 12V PWM controller, or an undersized inverter, causes poor performance or damage. Make sure every part in the chain handles the system’s voltage and current.
Conclusion
Hooking up a solar panel to a battery is straightforward once you follow the rules: always wire through a charge controller, connect the battery to the controller first and the panel second, match polarity, and fuse the battery line.
Pick MPPT over PWM for anything beyond a small setup, use wire heavy enough for the current, and add an inverter only if you need AC. Get the order right and you will have a safe system that charges reliably for years.
Frequently asked questions
Can I connect a solar panel directly to a battery?
No, not for anything beyond a tiny trickle charger with built-in protection. A normal panel puts out 18 to 20 volts, which overcharges a 12V battery. You need a charge controller in between.
Do I connect the battery or the solar panel to the controller first?
The battery first, always. The controller needs battery voltage as a reference to detect the system voltage. Connecting the panel first can permanently damage the controller.
What size charge controller do I need?
Match it to your panel wattage and battery voltage. PWM works for small 12V setups; choose an MPPT controller for systems over about 200 watts to capture 20 to 30 percent more energy.
Do I need a fuse between the solar panel and battery?
Yes. Put a fuse or breaker in the line between the battery and the charge controller, sized to the controller’s rating, so a short blows the fuse instead of the wiring.
What battery is best for a solar setup?
A deep-cycle battery built for repeated charging and draining. LiFePO4 (lithium) lasts longer and weighs less, while deep-cycle lead-acid is cheaper upfront. Avoid car starter batteries.
Related Articles
Lithium Battery vs High Capacity Battery: Which Is Better?
Is a Car Battery AC or DC Voltage? DC, and Here Is Why